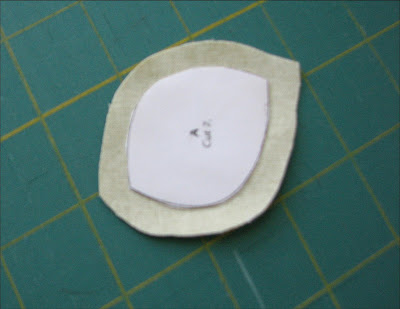
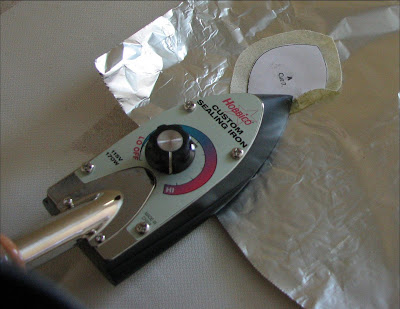
1. Take two pieces of freezer paper (large enough for your templates) and with waxed sides down, iron them together. This makes one sturdier piece.
2. Glue template to top of freezer paper (unwaxed side).
3. Cut your template (this one is a leaf that will go on that vine I showed you a few blogs ago, when I made that bias tape). Now, be sure to cut your template on the line. In my picture, mine is not cut on the line, 'cuz I lost my head. However, I did catch my mistake and fixed it.
 4. Cut a piece of fabric a bit larger than your template.
5. Iron the template (waxed side down) onto the WRONG SIDE of your fabric piece.

6. Cut around template, leaving 1/4" seam allowance.
 7. Using liquid starch (store bought {Mary Ellen's Best Press} or homemade {1/4 cup Sta Flo liquid starch + 3/4 cup water}), paint around the 1/4" seam allowance. You want to get it on enough to be effective, but not so much that it seeps under the edges and dislodges the wax from holding the template onto the fabric. Do small sections at a time, as you iron as you go.
 8. Iron the 1/4" seam allowance that you've starched over the template (bringing the right side of the fabric over the template). If using a steam iron -- BE CAREFUL! Dry irons are safter for your fingers, when turning the fabric.
 9. Okay, here is the backside of my leaf. It might look finished, but it's not. See the arrows pointing to the creases? You will want to iron those out as best you can, using a stiletto or your fingers. If you skip this process, no one will die, but your leaf or whatever will not be smooth on the front side. I'm just beginning to learn, so mine still are not perfect (as you can see below, where the leaf is right side up).

10. The top and bottom edges of the leaf will have to be trimmed way down and fray check added, to keep the raw edges from raveling.

11. After your leaf (or whatever) is all nice and ironed smooth, PULL THE FREEZER PAPER AND TEMPLATE OUT, glue it in place on your fabric with the tiniest drop of Glue Baste (like, smaller than a pin head). That will hold it in place instead of pins, and keep you from being poked or the pieces from moving around.

That's it! How you sew them on is this: carefully! You want to barely catch the edge of the fabric with your needle. Matching thread counts!!! The whole idea for beautiful applique is to not have any of your stitches showing. This takes practice, so be patient.... and keep trying - like me! :)
Or... I suppose you could just glue every single piece and just never wash it. lol
3 comments:
So the paper stays inside the applique?
Good question, Emily!!! Thanks for pointing that out (I went back and changed it). You pull the paper out before gluing it on the fabric for sewing. Man, that was an important step to forget! Good thing you are on the ball! :) thanks
You are soooo cool! Want to do something LEARN how... like Liz!
Post a Comment